Так, в моей другой жизни я на самом деле учитель науки, и, как правило, становится круглым, что я «хорошо с компьютерами» я обычно задают, чтобы посмотреть на несколько вещей. Дважды за последние несколько месяцев я спросил, если бы я настроить условное форматирование в Excel, чтобы окрасить результаты тестирования коды студента по сравнению с их целевыми оценками. Хотя точно не связано с содержанием основного этого сайта, он по-прежнему DIY техническую помощь, поэтому я решил опубликовать здесь полный набор инструкций. Наслаждаться…
 First you need a lookup sheet
- Create a new sheet in the workbook.
- Fill in 2 columns – the left with grades (1с, 1б, 1а, 2c etc) and the right with a “score” value (can just be 1, 2, 3, 4, 5 так далее)
- Fill in 2 additional columns with a “reverse lookup” which is the same as before but with the 2 columns reversed
- Highlight the full left hand table that you’ve created, нажмите правой кнопкой мыши, and select “define name”. Give it a name, например. “lookup”
- Highlight the second table you created, right click and define another name. Give it a name, например. “reverse_lookup”
 Creating the worksheets
- Now create a worksheet for each class, group or year (as suits). Include a column for target grades and various columns for test or assessment results (например. как показано ниже)
- Note in this example that target data is in C3 – C5. Results are in D3 – F5
Building the basic conditional formatting
- Select cell D3 – the top left of the results data cells. Make sure you are on the “home” tab and click on “conditional formatting” and select “new rule”
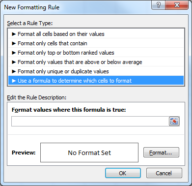
- Select “use a formula to determine which cells to format”
- What we want to do is compare the current cell to the target, but it isn’t quite as simple as that, because of the way excel compares values – so we need to use the lookup tables.
- We also need 5 rules – 2 sublevels or more below, 1 ниже, on target, 1 выше, и 2 or more above. You can create more rules if you want more detail or less if you just want below, on and above target.
- The eventual formula for 2 sublevels or more below will be
=VLOOKUP($C3,Lookup,2,FALSE)-1>VLOOKUP(D3,Lookup,2,FALSE)
- The C3 in the first part refers to the top target cell, and the D3 refers to the top actual result cell. The “Lookup” refers to the lookup table range that we named earlier.
- To break this down – we’re looking up numerical values for both the target and the actual score in the current cell. Because we want 2 sublevels or more below we take 1 off the target and say it must still be greater than the score. The $ before the C of C3 ensures that when we use the same formula for other columns they will still be compared to the targets column.
- Now click on format and apply the formatting you want. I use a background colour of light red
- Now we have created 1 из 5 rules for a single cell.
 Expanding the conditional formatting for multiple rules
- Next repeat the process to create 4 more rules.
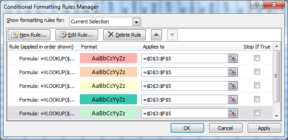
- When all are finished my 5 examples would look as below. Only the comparison and possible addition or subtraction change between them. Also note the order (which we come to next)
=VLOOKUP($C3,Lookup,2,FALSE)-1>VLOOKUP(D3,Lookup,2,FALSE)
=VLOOKUP($C3,Lookup,2,FALSE)>VLOOKUP(D3,Lookup,2,FALSE)
=VLOOKUP($C3,Lookup,2,FALSE)=VLOOKUP(D3,Lookup,2,FALSE)
=VLOOKUP($C3,Lookup,2,FALSE)+1<VLOOKUP(D3,Lookup,2,FALSE)
=VLOOKUP($C3,Lookup,2,FALSE)<VLOOKUP(D3,Lookup,2,FALSE)
- I use medium red, светло-красный, желтая низкий, medium green and light green (в этом порядке) для фоновых цветов
Sorting the order of the rules
- Окончательно, мы должны убедиться, что правила в правильном порядке, и применять их всем итальянским разрешением-ULTS клеток, не только один разрешением-ии клеток D3.
- Click on the conditional formatting button again and choose “manage rules…”
- Убедитесь в том, что правила в правильном порядке - как и выше (medium red, светло-красный, желтая низкий, medium green, светло-зеленый)

- Click in the “Applies to” box and enter the full range of cells which will contain results. In my example this is
=$D$3:$F$5. Положите это в все 5 "Относится к" коробки - This sheet should now fully work with conditional formatting
Expanding easily to additional sheets
- To apply to other sheets simple copy and paste a single cell which already has conditional formatting applied to it, в новый лист.
- Then click on the conditional formatting button, выбрать правила мужчина возраста, и изменить 5 “applies to” boxes to point to the cells of the new sheet which need conditional formatting


привет, Джон,
Есть ли у вас пример созданного вами листа?? Struggling following the steps here!
Я хотел бы вновь размещать эту статью на свой сайт, бы, что все будет в порядке?
Конечно, as long as you drop in a link to the original article here 🙂
Здравствуй,
Great tutorial — thanks. У меня есть 3 различных цветов прекрасно работает, но 2 выше, и 2 ниже, не форматирование их правильными цветами. Они меняются в красный и зеленый, но не оттенки, что они должны изменить, чтобы. Любые наводит на ГЭС-ные пожалуйста?
Спасибо,
Гари
Sorry for the long delay in replying Gary — I’ve been busy migrating the site to our new VPS. Знаете ли вы человек-возраст, чтобы получить этот Сер-Тед? If you didn’t then by all means zap me over your excel file to have a look at. Я перепроверить это руководство на следующий день или 2 to make sure there aren’t any typo’s or misleading parts, it’s been known to happen 😉
Я следовал всем вашим указаниям выше, но ни один из моих клеток не пошли цветные?? Любые наводит на ГЭС-ции, куда я иду неправильно??
Я предполагаю, что вы поп-и связан-ные их с данными, и целевой столбец также заполняется данными?
By all means zap me the file over and I’ll take a quick look — I’ve e‑mailed you