
我有 以前写过 关于修改便宜的10英镑智能插头来运行开源固件的问题. 现在我有很多,我需要一种有效的方法来更新它们. 在本文中,我记录了如何做
I have a range of Smart Plugs but they’re all based on the ESP8266 chip and all have at some point been flashed to the tasmota firmware provided by Theo Arends. 然而, many of them were running a very old version and I wanted to update it for security reasons. This proved to be a fairly simple process once I’d figured it out.
首先, 识别您当前的固件
使用网络浏览器加载设备的管理页面. At the bottom of the page it will say what version you are on
使用内置系统将更新作为多阶段过程进行
我不得不闪光 5 firmware versions to get up to 8.2, as I was on such an old version, and a direct leap isn’t supported without losing configuration. 我只是使用内置工具 (web interface; firmware upgrade; 指向* .bin文件. 有一个 official Wiki with the migration path details that you should refer to for the most up-to-date information. Currently the process is (jump into it based on your current firmware)
- Sonoff-Tasmota 3.9.22
- Sonoff-Tasmota 4.2.0
- Sonoff-Tasmota 5.14.0
- Sonoff-Tasmota 6.1.1
- Sonoff-Tasmota 7.2.0
- Sonoff-Tasmota 8.1.0
- 最新发布的
如果更新出错, 您必须重新刷新设备
I had a couple that didn’t reboot properly during the process. 我只是打开它们, connected my CH340g, 并使用 Tasmotizer 1.1 with the final firmware I wanted (在写作时 8.2). I then had to connect to the device directly via wireless and set my wifi SSID and password (don’t forget to tick the box)
设备更新后,我必须重新配置其中一些以前具有自定义固件的设备
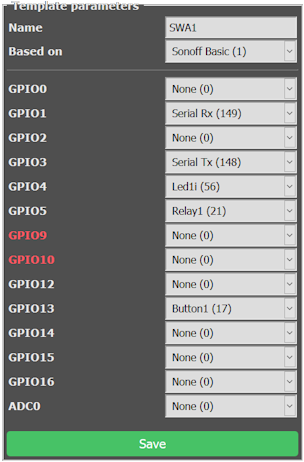
The firmware has greatly improved the ability to create a “custom profile” for different types of devices. I have several which needed different configurations. 我在下面提供每个的详细信息. To create a custom config go to Configuration: Configure Template. I usually select the Sonoff Basic as the starting point, and I give the template an obvious name (e.g. SWA1). 保存,设备将重新启动. Once it has restarted go to Configuration: Configure Module: and then select the newly created template. 设备将再次重新启动.
SWA1模块: Linganzh; 库萨; Annstory
“Hi James I realise it has been a long while, but I just checked this on windows 11 (build 23H2)…”