میرے پاس previously written about modifying cheap £10 smartplugs to run open source firmware. Now I have quite a number of them I needed an efficient way to update them. In this article I document how to do
I have a range of Smart Plugs but they’re all based on the ESP8266 chip and all have at some point been flashed to the tasmota firmware provided by Theo Arends. کس طرح کبھی, many of them were running a very old version and I wanted to update it for security reasons. This proved to be a fairly simple process once I’d figured it out.
اولا, اپنے موجودہ فرم ویئر کی شناخت کریں
ویب براؤزر سے ڈیوائس کا ایڈمن صفحہ لوڈ کریں. At the bottom of the page it will say what version you are on
بلٹ میں موجود نظام کا استعمال کرتے ہوئے ملٹی مرحلے کے عمل کے طور پر اپ ڈیٹس کریں
مجھے فلیش کرنا تھا 5 firmware versions to get up to 8.2, as I was on such an old version, and a direct leap isn’t supported without losing configuration. میں نے ابھی بلٹ ان ٹول کا استعمال کیا ہے (web interface; firmware upgrade; * .bin فائل کی طرف اشارہ کریں. ایک نہیں ہے official Wiki with the migration path details that you should refer to for the most up-to-date information. Currently the process is (jump into it based on your current firmware)
- Sonoff-Tasmota 3.9.22
- Sonoff-Tasmota 4.2.0
- Sonoff-Tasmota 5.14.0
- Sonoff-Tasmota 6.1.1
- Sonoff-Tasmota 7.2.0
- Sonoff-Tasmota 8.1.0
- تازہ ترین ریلیز
اگر تازہ کاری غلط ہو جائے, آپ کو آلہ دوبارہ چلانا پڑے گا
I had a couple that didn’t reboot properly during the process. میں نے انہیں سیدھا کھولا, connected my CH340g, اور استعمال کیا جاتا ہے Tasmotizer 1.1 with the final firmware I wanted (لکھنے کے وقت 8.2). I then had to connect to the device directly via wireless and set my wifi SSID and password (don’t forget to tick the box)
ایک بار جب آلات کو اپ ڈیٹ کیا گیا تو مجھے ان میں سے کچھ کو دوبارہ تشکیل دینا پڑا جس میں پہلے کسٹم فرم ویئر موجود تھا
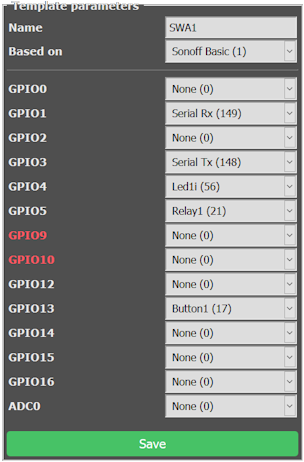
The firmware has greatly improved the ability to create a “custom profile” for different types of devices. I have several which needed different configurations. میں ذیل میں ہر ایک کے لئے تفصیلات فراہم کرتا ہوں. To create a custom config go to Configuration: Configure Template. I usually select the Sonoff Basic as the starting point, and I give the template an obvious name (مثلا. SWA1). محفوظ کریں اور آلہ دوبارہ شروع ہو جائے گا. Once it has restarted go to Configuration: Configure Module: and then select the newly created template. اس کے بعد یہ آلہ دوبارہ شروع ہو جائے گا.
SWA1 ماڈیولز: Linganzh; COOSA; Annstory


“Hi James I realise it has been a long while, but I just checked this on windows 11 (build 23H2)…”