
मेरे पास है previously written about modifying cheap £10 smartplugs to run open source firmware. Now I have quite a number of them I needed an efficient way to update them. In this article I document how to do
I have a range of Smart Plugs but they’re all based on the ESP8266 chip and all have at some point been flashed to the tasmota firmware provided by Theo Arends. कैसे कभी, many of them were running a very old version and I wanted to update it for security reasons. This proved to be a fairly simple process once I’d figured it out.
सबसे पहले, अपने वर्तमान फर्मवेयर की पहचान करें
डिवाइस के एडमिन पेज को वेब ब्राउजर से लोड करें. At the bottom of the page it will say what version you are on
इन-बिल्ट सिस्टम का उपयोग करके अपडेट को एक मल्टी-स्टेज प्रक्रिया के रूप में करें
मुझे फ्लैश करना था 5 firmware versions to get up to 8.2, as I was on such an old version, and a direct leap isn’t supported without losing configuration. मैंने अभी बिल्ट इन टूल का इस्तेमाल किया है (web interface; firmware upgrade; * .bin फ़ाइल को इंगित करें. वहां पर एक official Wiki with the migration path details that you should refer to for the most up-to-date information. Currently the process is (jump into it based on your current firmware)
- Sonoff-Tasmota 3.9.22
- Sonoff-Tasmota 4.2.0
- Sonoff-Tasmota 5.14.0
- Sonoff-Tasmota 6.1.1
- Sonoff-Tasmota 7.2.0
- Sonoff-Tasmota 8.1.0
- नवीनतम प्रकाशन
अगर अपडेट गलत हुआ, आपको डिवाइस को फिर से चालू करना होगा
I had a couple that didn’t reboot properly during the process. मैंने बस उन्हें खोला, connected my CH340g, और इस्तेमाल किया Tasmotizer 1.1 with the final firmware I wanted (रिट आईएनजी का समय 8.2). I then had to connect to the device directly via wireless and set my wifi SSID and password (don’t forget to tick the box)
एक बार डिवाइस अपडेट होने के बाद मुझे उनमें से कुछ को फिर से कॉन्फ़िगर करना पड़ा जो पहले कस्टम फर्मवेयर थे
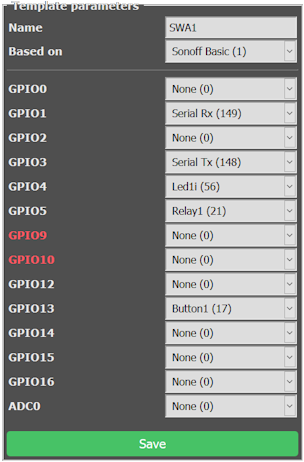
The firmware has greatly improved the ability to create a “custom profile” for different types of devices. I have several which needed different configurations. मैं नीचे प्रत्येक के लिए विवरण प्रदान करता हूं. To create a custom config go to Configuration: Configure Template. I usually select the Sonoff Basic as the starting point, and I give the template an obvious name (उदा.. SWA1). सहेजें और डिवाइस पुनरारंभ हो जाएगा. Once it has restarted go to Configuration: Configure Module: and then select the newly created template. डिवाइस फिर से रिबूट होगा.
SWA1 मॉड्यूल: Linganzh; COOSA; Annstory
“Hi James I realise it has been a long while, but I just checked this on windows 11 (build 23H2)…”