
У меня есть ранее написано о модификации дешевых смарт-розеток за 10 фунтов стерлингов для запуска прошивки с открытым исходным кодом. Теперь у меня их довольно много, мне нужен был эффективный способ их обновить. В этой статье я описываю, как это сделать
У меня есть ряд умных вилок, но все они основаны на микросхеме ESP8266, и все в какой-то момент были прошиты на прошивку tasmota, предоставленную Тео Арендсом.. Однако, у многих из них была очень старая версия, и я хотел обновить ее по соображениям безопасности. Это оказалось довольно простым процессом, как только я понял,.
Во-первых, определить вашу текущую прошивку
Загрузите страницу администратора устройства с помощью веб-браузера.. Внизу страницы будет указано, какая у вас версия.
Выполняйте обновления как многоэтапный процесс, используя встроенную систему
Мне пришлось прошить 5 версии прошивки до 8.2, как я был на такой старой версии, и прямой переход не поддерживается без потери конфигурации. Я просто использовал встроенный инструмент (веб-интерфейс; обновление прошивки; указать на * .bin файл. Есть официальная вики с подробностями о пути миграции, к которым вам следует обращаться для получения самой последней информации. В настоящее время процесс (перейти в нее на основе вашей текущей прошивки)
- Sonoff-Tasmota 3.9.22
- Sonoff-Tasmota 4.2.0
- Sonoff-Tasmota 5.14.0
- Sonoff-Tasmota 6.1.1
- Sonoff-Tasmota 7.2.0
- Sonoff-Tasmota 8.1.0
- Последний релиз
Если обновление идет не так, вам придется перепрошить устройство
У меня была пара, которая не перезагружалась должным образом во время процесса. Я просто открыл их, подключил мой CH340g, и использовал Тасмотайзер 1.1 с финальной прошивкой хотел (на момент-мости 8.2). Затем мне пришлось подключиться к устройству напрямую по беспроводной сети и установить SSID и пароль Wi-Fi. (не забудьте поставить галочку)
После того, как устройства были обновлены, мне пришлось перенастроить некоторые из них, на которых ранее была кастомная прошивка
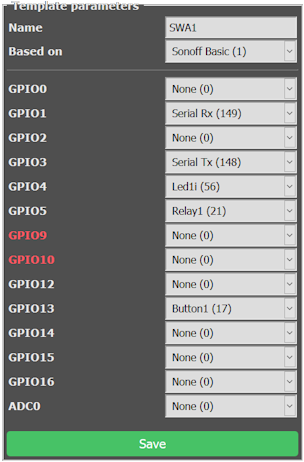
Прошивка значительно улучшила возможность создания «пользовательского профиля» для различных типов устройств.. У меня есть несколько, требующих разных конфигураций. Я предоставляю детали для каждого ниже. Чтобы создать собственную конфигурацию, перейдите в раздел Конфигурация.: Настроить шаблон. Я обычно выбираю Sonoff Basic в качестве отправной точки, и я даю шаблону очевидное имя (например. SWA1). Сохраните и устройство перезагрузится. После перезапуска перейдите в Конфигурация: Настроить модуль: а затем выберите вновь созданный шаблон. Затем устройство перезагрузится.
Модули SWA1: Linganzh; Coosa; Annstory
“Hi James I realise it has been a long while, but I just checked this on windows 11 (build 23H2)…”